PAPILLOTS(fr. papillote - paper wrapper). Used in the restaurant kitchen, paper tubes with various cutouts and scallops, with the help of which they hide the ends of the bones of animals or poultry protruding from the meat. The papillotes also play the role of a handle, by which you can hold the portion without smearing your hands on the fat, and make it easier to divide the portion into smaller pieces.
Papillotes first appeared in the 19th century in French restaurant cuisine, from where they quickly spread to many cuisines of the world, incl. and into Russian restaurant cuisine. Papillots were especially widely used in Soviet restaurants and in the communist Kremlin cuisine.
To decorate fried game, cutlets and chops with bone, hams on the bone, paper papillots and rosettes are used.
For papillotes, a sheet of paper is folded three times in length, then the edge of the paper is folded with a width of 1-1.25 cm and strips are evenly cut across the entire width of the paper with a sharp knife or scissors. The paper is cut into 4 strips, wrapped on a round stick, giving the appearance of a flower, and its ends are folded.
To make a rosette, paper with a size of 12:12 cm is folded in 4 layers (in half and again in half), cut obliquely and corrugated using a thin cloth. Then the sharp tip of the rosette is cut off, the rosette is unrolled and put on the papillote and on the bone (see below).
"... I have never written about how to cook fish in papillotes. Papillote, dear dull-headed, in cooking is a twisted cut piece of paper that is usually put on the bones of cutlets or fried poultry. Well, except that Gedrius managed to cook catfish in a papillote. his lady who was screwed into her hair. "
(an excerpt from the Lithuanian literature of the twentieth century).
The scheme for making the simplest papillote:
1. The paper should not be very thin — printer paper is best.
2. Take heavy white paper and cut a strip about 8 cm long and 4 cm wide.
3. Fold the strip in the middle along the length.
4. Cut the folded paper along the fold with scissors into even notches - you get something like a fringe.
5. Spiral cut paper around a round stick, the diameter of which coincides with the diameter of the bone.
6. Glue the end of the paper strip with food glue made of boiled starch or flour, or gelatin, or attach with tape.
NOTE. Although recently, for simplicity, papillotes are often glued together with tape, but it must be admitted that scotch tape does not agree well with edible products, therefore food glue made of flour or starch, or gelatin is always more preferable.
7. Trim the bottom of the cuff with scissors.
Use the finished papillotes to decorate the bird.
Photo step by step production the simplest papillote:
Lemon jewelry can be made quickly and fairly easily. Any hostess can do it. And how, thanks to such decorations, dishes and the whole festive table are transformed! Today I will show you, dear readers of the site "Notes to the Family", how to make some simple, but spectacular decorations from lemon (or orange) for festive dishes.
How to make lemon jewelry
Even ordinary dishes, if decorated with imagination and love, will look elegant and seem even more delicious. Do you agree?
Beautiful presentation and decoration of dishes is a whole art. And we are used to thinking that an original decorated dish can only be served in a restaurant. But after all, there are a lot of not at all complicated decorations, for which you do not need to have any special skills, and which any housewife can easily cope with - there would be a desire!
It's just that many of us don't think about this question at all. And imagine that you came to visit your friend, and on her festive table there are not only the usual salads, fish, meat, sliced dishes, but there are small but very cute decorations that immediately change the appearance of the usual dish and the whole table ... You’ll notice and appreciate this right away, don’t you?
And, meanwhile, it is very easy to make such small decorations for dishes. And don't think that it will take long.
 Just recently I gave it to you.
Believe it or not, it takes me no more than a minute to make each bee!
And today I want to show you how to make simple decorations for dishes from citrus fruits - lemon or orange. New Years Eve - Year of the Monkey - decoration festive table citrus fruits will be especially important!
The simplest lemon decoration is a knot

How to make a lemon with a knot
 1. Wash the lemon.
Cut off the ends of the lemon and cut the lemon in half.
 2. For each lemon half, cut off a strip of rind, but do not cut it all the way off.
 3. Tie this cut strip in a knot. This will create an elegant curl.
For beauty, place a small sprig of parsley on top of the lemon, and put a few drops of ketchup on the parsley. It will look like red berries.
Beautiful? But you can't imagine any easier!

How to make a lemon star decoration
 1. Take a lemon or orange and cut it into slices.
Take a slice from the middle - the larger one.
Cut the zest from it in a thin layer. Leave the white shell!
 2. Cut this slice with a knife along the contours of the slices from the edges to the center.
But do not cut only the white shell!
 3. Now gently turn this slice with your hands so that the triangles of the lemon pulp are out.
These will be the rays of the star.
 4. It should look something like this.
Place this slice on the dish to be decorated.
 5. Take another lemon slice and peel off the rind along with the white shell.
Insert this slice inside our star.
For decoration, you can put a circle cut from an olive in the center of the star.
Lemon decoration - butterfly

How to make a lemon or orange butterfly
 1. It is good if you have a special knife for removing the peel. With this knife, you will need to make longitudinal grooves in the lemon peel.
But if there is no such knife, it doesn’t matter either. Then just after step 2, you will need to make recesses on each circle with an ordinary knife.
 2. Cut the lemon into slices.
 3. Cut 2 triangles opposite each other with a knife from each circle.
 4. Remove the 2 triangles.
The rest will be butterfly wings.
 5. Cut the body of the butterfly out of the peel of a lemon or orange and attach it to the wings.
6. Cut small circles from olives or olives and decorate the butterfly wings with them.
7. Make antennae from parsley sprigs.
Very cute butterflies from lemon are obtained!
Lemon berry basket
A basket with lemon berries is a very effective decoration in itself. It can also be used to decorate any fish dishes, both cold and hot.

How to make a lemon basket with berries
 1. To stabilize the basket, cut off one of the sides of the lemon. This will be the bottom.
2. Cut through the handle of the basket at the top. To do this, make 2 cuts to the middle of the lemon.
 3. Next to the handle, make another cut diagonally to the middle of the lemon and remove the triangle.
 4. Again, make another cut next to the middle of the lemon.
5. Make a cut parallel to the bottom at the widest part of the lemon and remove the triangles.
The remaining slice will act as the lid of the basket.
 6. Now repeat steps 2 through 4 for the other side of the lemon, and remove the pulp from the basket handle.
 7. Insert twigs of curly parsley into the basket on both sides.
8. Apply drops of ketchup to it. They will resemble red berries.
Well, isn't it a beauty?
Original lemon decoration - piglet
This funny lemon pig is just a fun decoration for the holiday table. But how many positive emotions he can evoke! It can be done very quickly and easily. He will paint on the table, and then this lemon can be used further for its intended purpose, for example, to drink tea with lemon.

How to make a funny lemon pig
 1. First, let's make the mouth of the pig. To do this, you need to make 2 oblique cuts at one of the ends of the lemon and remove the cut piece.
 2. Now, above the mouth on both sides, make 2 slanting cuts for the eyes.
3. In these cuts you need to insert a pea of black pepper.
 4. Now let's make the tail of the pig.
To do this, cut off a thin strip of peel from the other end of the lemon, but not completely.
 5. It remains only to put our lemon pig on its legs.
For this we need wooden toothpicks. Stick them on the underside of the lemon to keep the pig steady on the table.
Have you smiled? And your guests will cheer up too! Go for it!
These are some simple lemon decorations you can make for a festive table.
 In addition, I have already taught you how to do decorations from olives and olives- bees, bunnies, acorns, etc. Will be especially relevant on this New Year's table palm trees.
For each piece I made a separate video. You can read and watch
I would be very glad to receive your comments!
And do not forget to share useful material with your friends on social media. networks!

For those who love not just cooking tasty dish, but also to depict a feed to match it, we propose to study our step by step wizard Class. With him on your table among meat and fish dishes, among the plates with snacks and cuts, an unusually beautiful lemon rose will bloom.
It can become not only a decoration, but also original version serving fragrant citrus.
Of course, such a table decor is relevant on holidays, especially on March 8th, on Valentine's Day or on New Year... But even to ordinary gatherings with friends, a citrus flower will add sophistication and charm. After all, it can be served to the tea table - there are always lovers of traditional tea with lemon and sugar, and to strong alcohol.
Making such a rose with your own hands is not at all as difficult as it might seem when looking at its thin transparent petals. As ingredients, we only need the lemon itself. , a very sharp thin knife and a small stand - it can be a glass or a lid of the required diameter.

* Cook Tips
- Choose a lemon with a very thin skin to make the lemon flower look more graceful.
- We definitely work in thin gloves, as even the smallest and most inconspicuous wound on the hand will make the procedure unbearable.
- The stand should be low so that the petals can be spread and not too wide, otherwise the rose will disintegrate.
Step by step execution

4. Having collected the lemon "roll", immediately place it with its round edges up in a container-stand. Now collected, gently straighten the flower petals, creating volume and splendor.
If a rose needs to be placed as a decoration for a dish, the bottom of the flower should be fastened with a toothpick.

Figured cutting and carving of vegetables and fruits "Delicious flower fantasy".
Simple cutting of vegetables and fruits step by step with a photo
Guest Ksenia Aleksandrovna, physical education teacher, MOU "School No. 53", Oktyabrsky settlement, Lyuberetskiy district, Moscow region.Goal and tasks:
- development of creativity, imagination;
- to form an aesthetic taste;
- to educate accuracy in the performance of work, caution;
- learn to cut vegetables using the "carving" technique
Purpose:
This master class is intended for high school children, teachers, parents and creative people. Such a design of dishes is suitable for any holiday, banquet and, simply, to improve the perception of food and good mood.
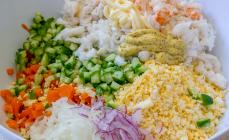
For decoration we need:
Tomato, cucumber, lemon, orange, pear, apple, kiwi, onion, cutting board, 2 knives (large and small with cloves), 2 flat plates, towel.

Progress.
Carving(from English carving - "cutting out") - the art of artistic cutting for vegetables and fruits, as well as for wood, ice and stones.Tips for a novice "carvinger" Not every fruit, vegetable is suitable for carving. So, for example, the radish should be large and bright, the carrot should be smooth and smooth, the orange should be very fresh. It is better to take apples with smooth skin, cucumbers - even and with dark skin, pumpkins with rough skin have a denser and more convenient pulp. Decorations should be combined with the dish in color and taste. Meat dishes better to decorate with cucumbers, tomatoes, carrots, seafood - lemons. Fruit will serve as an excellent decoration for a dessert, as well as an independent delicacy. When choosing combinations of products, give preference to contrasting colors - the compositions will be more enchanting. Red, green, yellow are favorites. Fruits and vegetables for carving must be clean and dry. Everything must have a golden mean. You should not over-decorate dishes - measure is important in everything.
1) The first vegetable to start with is a tomato. We cut it in half and cut off the unnecessary part.

2) Then, with a sharp knife, thinly cut one of the halves of the tomato.

If it is small, then you can combine the two sliced halves into one. As in the photo.

3) After that we "stretch" the tomato as thin as possible and begin to twist it into flowers.


4) In order to gently transfer the finished flower to the dish, you need to grab it with both hands, pressing it from all sides.

Ready! You can put a leaf of lettuce on the bottom of the plate.

5) Our flower is missing something. You can add parsley or make cucumber bells. To do this, put the cucumber in the palm of your hand. With a sharp small knife, directing it towards ourselves, cut the cucumber in the shape of a petal, dipping the knife blade to the middle. Then, turning it, cut two more petals.

6) You should get a bell with three petals. To separate the flower from the cucumber, you need to turn it slightly and it will disappear by itself.


Then you can continue in the same order until the cucumber runs out.

You can add strips of pepper or olive oil to the middle of the bells.


7) You can also cut thin strips of cucumber and fold them in half without breaking them to complement our dish.


8) Gradually we move on to the bow. What can be made from onions? We can make a water lily out of it. To do this, the onion must be peeled, soaked in cold water so we don't cry. Then you need to cut it evenly with teeth, immersing the knife only to the middle. Upon completion, it will easily fall into two halves.

All parts of the onion must be removed and collected, already forming a flower.


9) Our decoration for the dish is ready and you can add chopped vegetables or cold cuts.

If you want to treat guests with sandwiches, you can use the middle for a tomato flower.


10) The vegetable decoration is ready. Now you can start decorating the fruit plate. To do this, we need to cut a half of an orange as described above.


11) Do the same with lemon.


By the way, the lemon flower goes very well with fish products.

12) Next, cut the kiwi, as in the photo. You can decorate a plate or spread it like this on the fruit.


13) Now my favorite. Apple and pear wings. We need the halves of the fruit.

Visually divide the apple in half. I cut out a strip for you, for clarity. On one of the halves we find the middle and immerse the knife slightly deepening. To make it easier to imagine, we kind of cut off the peel. You need to get half a petal.

Then, on the other hand, we do the same thing, but we cut exactly to the corners made. It is necessary to ensure that the excess is not cut off. It turned out to be a piece of paper.


Departing from the cut out 2-3mm, cut out the next leaf.


Cut it out until we reach our "border" of the apple.


Now we connect all the parts and push them apart so that we get a wing.


14) These wings look like petals, so they can be used in cooking when decorating any dishes. And so that the apple does not darken, it must be sprinkled with lemon or dipped in acidified water.